
Expandable Multi-Shapes in Visio with Hesco Barriers
06 January 2013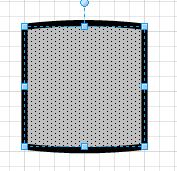
Hesco barriers are steel baskets with fabric in them that we fill with dirt overseas to create thick, protective walls. They are a very common feature on any site, and it would be nice to have a shape that distinctly looks like a Hesco barrier on the camps site diagram. Today I'm going to show you how to make that. Because its an individual cell that is usually never alone, I'm going to make a continuous shape or a multiple shape to accomplish this task.
What that means is that as I expand the individual Hesco, it becomes two side by side, then three, four, etc. eventually to make a full length Hesco wall. If you ever worked with Visio floor plans, you may recall a shape called Multi-Urinal or Multi-sink that has this ability. In abstract, what we are going to do is create a bunch of identical shapes, uniquely ID each one of them, and use formulas to determine their placement. We will also use a formula to hide/ unhide each shape in the group depending on how wide the group is expanded out to.
This shape is available with several other expandable shapes here:
http://www.tactical-tech.net/blogPage.php?id=57
The first thing I'll do is create the base shape I'll be dealing with, then copy and paste it to where I want it in relation to the original. I'll then select both shapes and group them. Right Mouse the shape and Group.
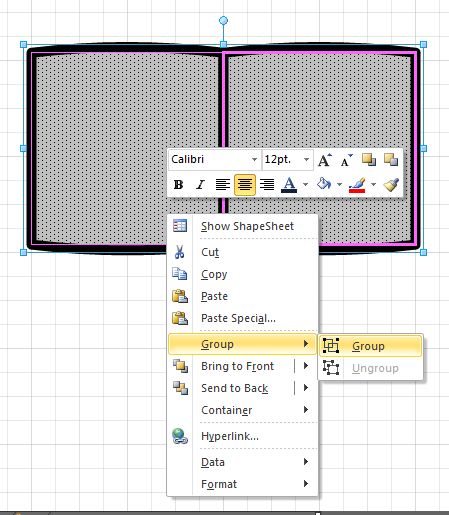
Now I need to know what the name of my newly created group is. This is a parent shape to the two Hesco cells created and properties can be pulled down to the child shapes from the parent. Right mouse the group and select Show Shapesheet
At the top of the shapesheet window, you will see the name of the group. In my case, It's Sheet.261. Jot down the name, you'll need it for later.

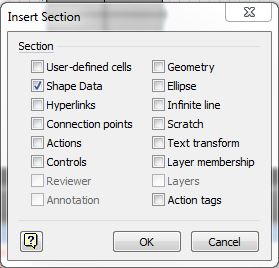
I'm going to create a couple properties for the group that the user can change. Hescos come in different sizes and I want the user to be able to change the size. I can create that property from the shapesheet by Right Mouse, Insert Section, and Shape Data. Shape data is where the user defines custom properties. In the "Shape Data" table that opens up, rename Prop.Row_1 to SectionWidth. Just select the cell and start typing. When done, the cell should be labeled Prop.SectionWidth Since this will be a numerical value, change the Type to 2 For now, I'll make the Value 2ft.
Transitive Properties: Relating the height to the SectionWidth
This next part is optional, but necessary for me. Because a Hesco is a perfect square (more or less), I want to relate the height to the width. This will be a transitive property, so when the user re-sizes using click and drag, it should update the shape data property, and if the shape data property changes, the height property should change to. This is more complex than it seems. What I need is a formula that placed in the height property that updates the shape data. This part of the formula places a 0 for the height value, so we will need to call on the shape data value we just defined and add that to the total value. Here is the formula I will use for Height:
=SETATREF(Prop.SectionWidth,SETATREFEVAL(SETATREFEXPR(2 ft)),TRUE)+Prop.SectionWidth
WARNING: Shapesheet values act funny and if I took the code above and copied it all in, it would usually be completely overwritten by the actual height when I go to resize. I discovered that I have to insert the first part of the code:
=SETATREF(Prop.SectionWidth,SETATREFEVAL(SETATREFEXPR(
before the current height (2ft) then cursor over to the other end of the formula and hand type the rest. If the original "2ft" or whatever value is overwritten, the formula might be overwritten entirely on re-size, or at least that is what I am experiencing.

Note: You can toggle the formula view and the values view under ShapeSheet Tools, Design
Shape Properties submenu
While I'm under the Group shape properties, I want to add an option to allow the user to right mouse the shape and bring up the shape properties. Right Mouse, Insert Section and Actions. Under the actions table, change Actions.Row_1 to Properties, Menu to ="%_P&roperties" and Actions to =DOCMD(1312).
Opening the group
Now, I need to start work on the first child shape. This shape will always be displayed no matter how small the parent shape (the grouping) gets, so it's unique. Close the shapesheet of the group and Right Mouse click on the group in the drawing. Select Group then Open Group. A new window will open with the two grouped shapes. Choose the first child shape, Right Mouse and choose Show Shapesheet
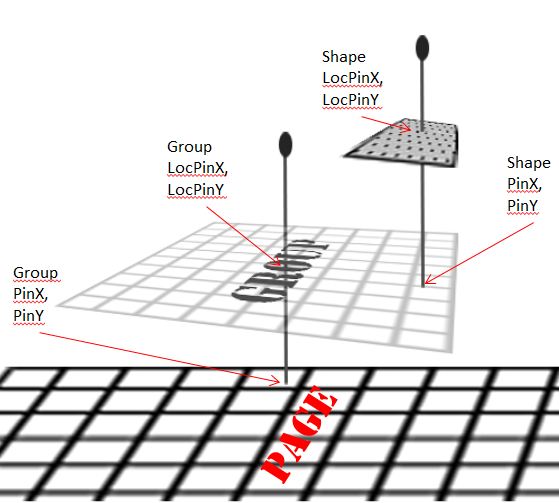
PinX and PinY
Before continuing on, I think it's important to quickly explain how a shape is pinned to a drawing board. The PinX and PinY values determine where the grouped objects will be placed on the page, and the child shapes values determine where the shape will be in relation to the group. The PinX and PinY is a single point that is generally in the centered in the middle of a shape by default (determined by the LocPinX and LocPinY). See the horrible artistic rendition below for a visual explanation of the concept.
Editing the first shape
Back to the shape, we're going to need to create a couple of User-defined Cells: Right Mouse, User-Defined Cells. Rename User.Row_1 to SectionWidth. Change the value to =Sheet.261!Prop.SectionWidth (Sheet.261 is the name of my group, replace that name with the name of your group.)
If you plan on growing your cells along the X axis, change width to =User.SectionWidth. If it's growing along the Y axis, change height to =User.SectionWidth If you're dealing with a square (like me) change height and width to the same:=User.SectionWidth. Change PinX (or PinY) to =User.SectionWidth/2
Base of the Growth shapes
Close the shapesheet of the first object, and open the shapesheet of the second object. This will become the base shape that we use to create all the other shapes, so it's important to get this one right other wise you'll have to do alot of editing after the other shapes have been made if a mistake was made. Create a user-defined cell in the same we we've been making them. Change User.Row_1 to SectionWidth. The value will be =Sheet.261!Prop.SectionWidth, again, replacing Sheet.216 with the name of the group. Right mouse the SectionWidth cell and choose Insert Row, then change the name to SectionNum. Give it the value of 2. Create another new row and rename it SectionNotVisible. Give it the following formula as a value: =IF(Sheet.261!Height/Sheet.261!User.SectionWidth < user.sectionnum,true,false) replacing sheet.261 with your group objects name.
Scroll down the shapesheet to the Geometry section. For each section (there is only one in my case) change the value of NoShow to =User.SectionNotVisible
Explanation: The formula is basically dividing the width of the group object by the SectionWidth to find out how many shapes can be viewed within the section. If that value is greater than the shapes user.SectionNum value, then it returns a true value and tells the geometry section to not display. Else, it returns false, and the geometry section allows the shape to be visible.
Like the first shape, change either the height or the width (in my case both) to user.SectionWidth. If growing along the X Axis, change PinX to =User.SectionWidth*(User.SectionNum-1)+User.SectionWidth/2, change PinY if going along the Y Axis. This prepositions the pin to the in the successive chain relative to the SectionNum value.
Growth Shapes
Close the shapesheet of the base shape, and close the grouped shape window. Expand the group border to the max size you plan on building out to. Right Mouse the group again, then Open Group. In the window that pops open, select the base shape we were just working on and copy/paste it. Open the Shapesheet properties of the new shape and change User.SectionNum to 3. You'll need to double check the formulas in the following (the formula's don't always copy over correctly)
User.SectionNotVisible = IF(Sheet.261!width/User.SectionWidth < user.sectionnum,true,false)
User.SectionWidth = Sheet.261!Prop.SectionWidth
PinY(or X) = User.SectionWidth*(User.SectionNum-1)+User.SectionWidth/2
PinX(or Y) = Sheet.261!Width*0.5
Width, height or both = Sheet.261!User.SectionWidth
Close the shape and test it out. As you resize the Group's shape as smaller than the chain, the child shapes should disappear. Grow it, and they should reappear. If it's all working fine, reopen the group and copy shape #3 and start building #4 in the same manner above. This is the tedious part because you have to check the shape sheets and usually copy in the formulas for each new shape in the chain, and of course change the SectionNum. I usually copy/paste from the last one created to help prevent me from loosing count.
Finishing up
When you've created as many as you're willing to in the chain of shapes, close the group window and all shape sheets. Now you'll notice that if you click on the group twice with a pause between that it selects a child shape. You probably don't want the user to screw up the child shapes, so to prevent the child shapes from being selected, choose the group and go to Developer and Behavior. Under Selection: choose Group Only. The user will now only be able to select the group.
Now to save the shape, create a new stencil and drag the new shape over to it and save it. (Go to More Shapes and New Stencil)